DIY: JDM CU2 Hazard Button Install
 06-10-2011, 02:10 AM
#1
Instructor
Thread Starter
DIY: JDM CU2 Hazard Button Install
I recently purchased this item and wanted to share this DIY with you guys. I AM NOT RESPONSIBLE FOR ANY DAMAGES YOU CAUSE FOR ATTEMPTING THIS. Other than that, hope you guys enjoy!
Tools needed:
JDM Hazard Button
screwdriver
towel to cover your shift knob and trim from scratches when taking out your deck
flathead screwdriver or something to pry with (not very necessary)
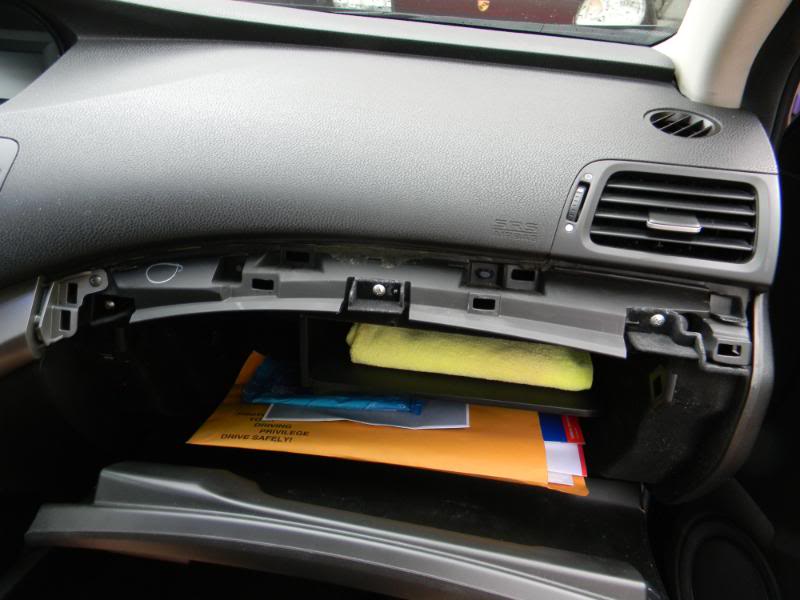
Step 1:
Start by taking off the grey (or black) dash trim right above your glove box. its held in by a few clips, its easiest to start by pulling up from the button and the right side.
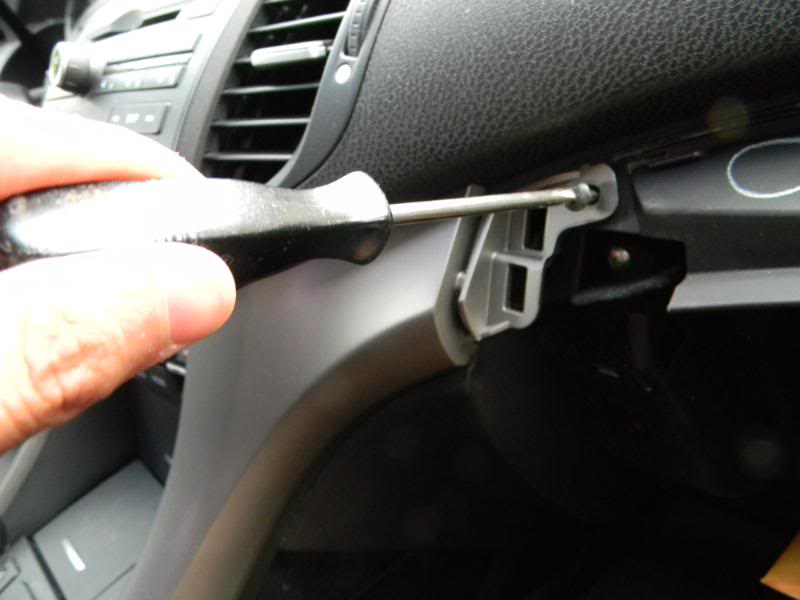
Step 2:
unscrew the screw on the right corner of the handle bar trim on the passenger side.
Step 3:
pull the trim around your shift knob area up. I recommend opening up your outlet and ashtray thing before doing this. pull up far back enough that your cup holders are loose.

Step 4:
there is 1 screw on each side of the trim that's holding it in place. its underneath the shift knob trim. (in the picture, its in the bottom center. you see the silver clip that holds the screw, to the right of the orange tab) remove both trims.
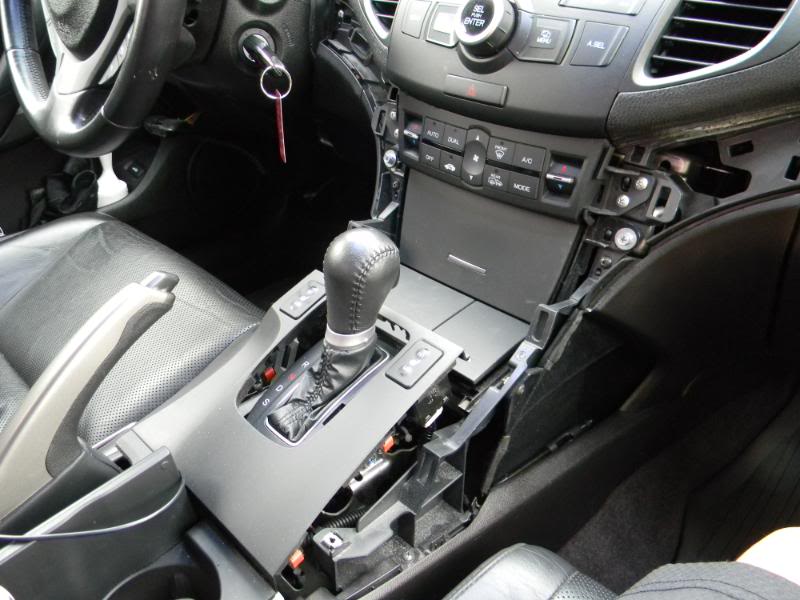
Step 5:
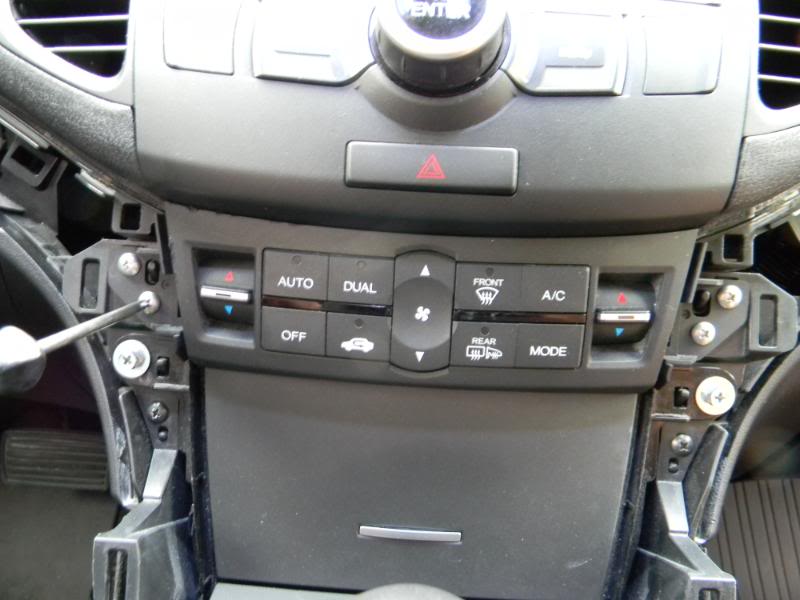

There are 4 screws holding your AC unit, unscrew those and pull it out. This gives you room to pull out your oem deck.
Step 6:
at the bottom of your oem deck, start there by pulling it out gently. pulling at an upward angle seems to help instead of just pulling it out straight forward.
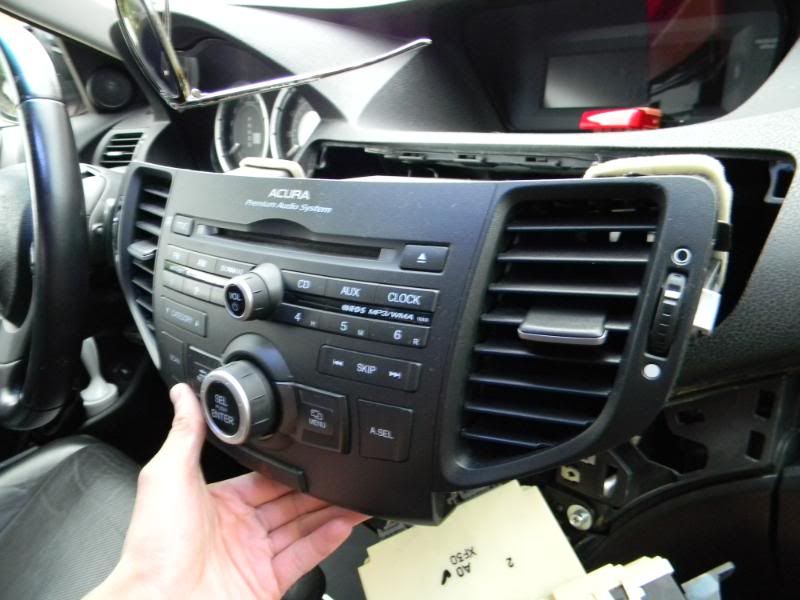
Step 7:
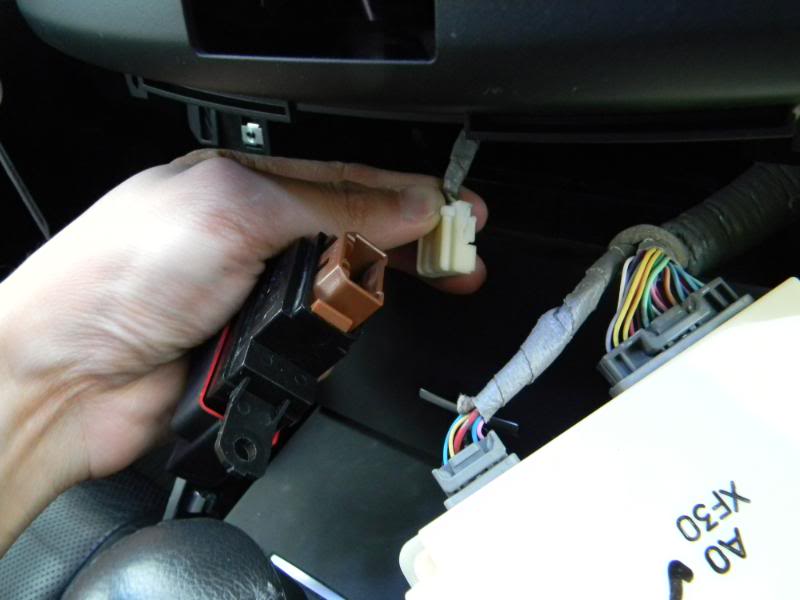
Disconnect the wire harness from your old hazard button. its held by a white clip. Here, you have the option of disconnecting all the wires to make it easier to unscrew the hazard button out. (I didn't do it because I was too lazy to, and I had enough room to just unscrew it without disconnecting all the wires, lol) it's only held in by 2 screws.
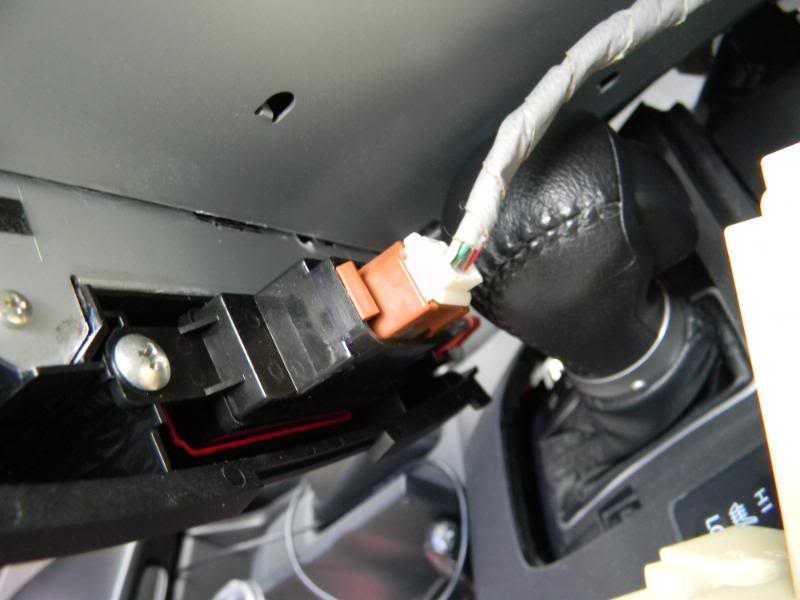
here's a picture after it is unplugged and the 2 screws are removed:
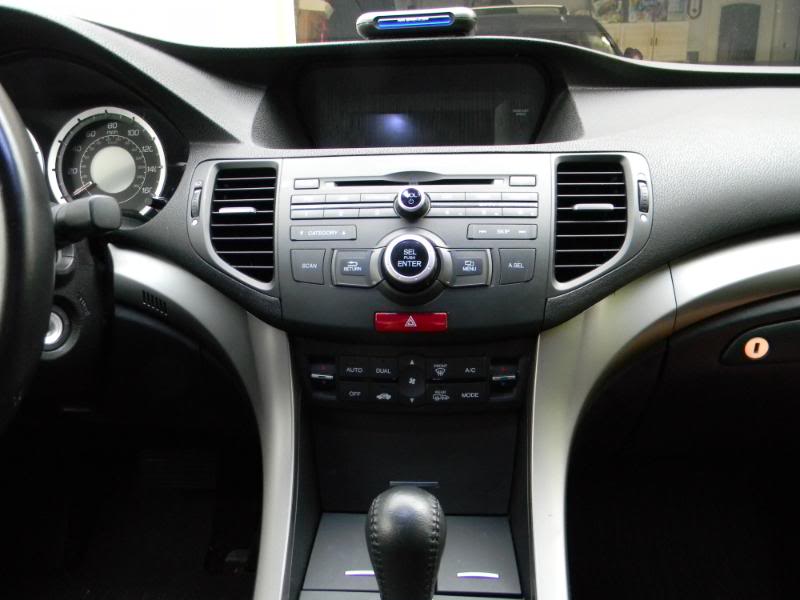
Step 8:
Put in your JDM hazard button and everything else together and you're done! Here's a picture of the finished product:
If you guys have any questions, don't be afraid to ask me or PM me.
Tools needed:
JDM Hazard Button
screwdriver
towel to cover your shift knob and trim from scratches when taking out your deck
flathead screwdriver or something to pry with (not very necessary)
Step 1:
Start by taking off the grey (or black) dash trim right above your glove box. its held in by a few clips, its easiest to start by pulling up from the button and the right side.
Step 2:
unscrew the screw on the right corner of the handle bar trim on the passenger side.
Step 3:
pull the trim around your shift knob area up. I recommend opening up your outlet and ashtray thing before doing this. pull up far back enough that your cup holders are loose.
Step 4:
there is 1 screw on each side of the trim that's holding it in place. its underneath the shift knob trim. (in the picture, its in the bottom center. you see the silver clip that holds the screw, to the right of the orange tab) remove both trims.
Step 5:
There are 4 screws holding your AC unit, unscrew those and pull it out. This gives you room to pull out your oem deck.
Step 6:
at the bottom of your oem deck, start there by pulling it out gently. pulling at an upward angle seems to help instead of just pulling it out straight forward.
Step 7:
Disconnect the wire harness from your old hazard button. its held by a white clip. Here, you have the option of disconnecting all the wires to make it easier to unscrew the hazard button out. (I didn't do it because I was too lazy to, and I had enough room to just unscrew it without disconnecting all the wires, lol) it's only held in by 2 screws.
here's a picture after it is unplugged and the 2 screws are removed:
Step 8:
Put in your JDM hazard button and everything else together and you're done! Here's a picture of the finished product:
If you guys have any questions, don't be afraid to ask me or PM me.

 06-10-2011, 08:05 AM
#5
that is F-ing Rawsome. Do you have a URL to the JDM button on where to buy?
06-10-2011, 08:10 AM
#6
You did all that, ripped almost entire of the front interior off just to replace the hazard button? R u kidding me?
I wouldn't do that.
I don't think it's worth.
Anyway, great instructions.
I wouldn't do that.
I don't think it's worth.
Anyway, great instructions.
Trending Topics
 06-10-2011, 10:32 AM
#10
I may be fat but I'm slow
That's cool, and I'm glad you like it, but if the TSX came with the JDM button, and I could buy the USDM button, I'd probably pay $100+ to swap the USDM button in, lol. Looks soooo tacky and out of place.
06-10-2011, 11:06 AM
#11
Sweet write up Rawsome! I was going to change mine as well but I just checked, mine comes with it stock in red :P At least now I know how to remove the centre console :o
Cheers man!
Cheers man!
06-10-2011, 10:04 PM
#15
maybe heeltoe will do a group buy 
i know you are reading this heeltoe! get in here with some vendor info
i know you are reading this heeltoe! get in here with some vendor info
06-10-2011, 10:11 PM
#16
You see me, I CU2
 06-11-2011, 04:55 PM
#17
Instructor
Thread Starter
for sure! whenever i get the chance
http://www.heeltoeauto.com/Honda-Gen...-pr-64902.html
for the coupon code type in "tsxrocks" and you get an additional discount! hopefully they have it in stock, if not you would have to wait 2-6 weeks for shipping
to each their own. thanks
your welcome!
LOL, it does, its just visually appealing to me. my girlfriend makes up reasons just to push it

as long as you like the USDM button!
you're lucky, i love the interior of the type s, too bad we don't have it over here in the US, and i think you mean dash but my DIY also shows how to remove part of the center console as well

yupp, we definitely have similar taste
most definitely! i just couldn't wait
tell me about it, why you gotta rub it in my face like that? haha jk
for the coupon code type in "tsxrocks" and you get an additional discount! hopefully they have it in stock, if not you would have to wait 2-6 weeks for shipping
tell me about it, why you gotta rub it in my face like that? haha jk
12-14-2012, 01:19 PM
#19
Everyday I'm rofling
Anyone remember or know how much the red button is? Too lazy to wade through the internet to find one.
12-14-2012, 01:40 PM
#20
Three Wheelin'
here is a link
http://www.heeltoeauto.com/honda-gen...ype-s-cu2.html
http://www.heeltoeauto.com/honda-gen...ype-s-cu2.html
12-14-2012, 01:48 PM
#21
Everyday I'm rofling
here is a link
http://www.heeltoeauto.com/honda-gen...ype-s-cu2.html
http://www.heeltoeauto.com/honda-gen...ype-s-cu2.html
I would be interested in this if it were like $15. Heeltoe hook me up for $15 shipped. It's a win-win situation!


 12-14-2012, 02:33 PM
#25
would be cheaper to get these guys to make a overlay for the TSX
http://grfxpstore.com/store/product/885036942
$50 bucks for a button isnt worth it to me.
it does look good but not $50 good.
http://grfxpstore.com/store/product/885036942
$50 bucks for a button isnt worth it to me.
it does look good but not $50 good.
12-14-2012, 02:52 PM
#26
Everyday I'm rofling
Oh that reminds me, I have an an unused 2' x 5' roll of red vinyl. I don't think it'll look very good on it though.
12-14-2012, 03:00 PM
#27
50$ puts out of casual mod territory, though im sure its expensive to get the button also from lings. ill try to beat all you suckers to it when its eventually on clearance
12-14-2012, 03:08 PM
#28
Everyday I'm rofling
The following users liked this post:
MC MiYoung3269 (12-15-2012)
12-14-2012, 04:46 PM
#30
ROTAREDOM
I don't get it, that red button sticks out like a sore thumb. Looks horrible. If I was overseas I would buy USDM hazard, it flows with everything else
12-14-2012, 06:04 PM
#31
Everyday I'm rofling
12-14-2012, 11:57 PM
#34
Pro
Yes, the Euro has a light in the button. I posted Pics from my Interior in the dark already in another Thread, dont know which Thread it was. But Must have been something with the hazard button!
Try search, if you dont find it, I will look at my Pics, maybe I still have them?
For me it looks much better than the black button US version!
Try search, if you dont find it, I will look at my Pics, maybe I still have them?
For me it looks much better than the black button US version!
12-15-2012, 01:08 AM
#35
its nice because it breaks up the dash and adds some contrast and looks great at night ^ sticker wouldnt do it
@opb: my ass deserves the best
@opb: my ass deserves the best
12-15-2012, 09:24 AM
#36
ROTAREDOM
Ehhh idk about breaking up the flow to add contrast. It's like saying I want my warnin stickers on my visors to be bright yellow with the text that glows in the dark so that it contrasts with my all black headliner...
This is def a "grass is greener on the other side" case lol
This is def a "grass is greener on the other side" case lol
12-15-2012, 10:10 AM
#38
the usdm one is actually red underneath if you sand it down.
not recommending that anyone do that, but it was kind of interesting to see.
not recommending that anyone do that, but it was kind of interesting to see.
The following users liked this post:
kixo (03-01-2016)
12-15-2012, 11:50 AM
#39
Ehhh idk about breaking up the flow to add contrast. It's like saying I want my warnin stickers on my visors to be bright yellow with the text that glows in the dark so that it contrasts with my all black headliner...
This is def a "grass is greener on the other side" case lol
This is def a "grass is greener on the other side" case lol
arguments can be made for aesthetics but that one sucks