JDM Puddle Light DIY
 06-11-2006, 10:08 PM
#1
Bye TSX, hello domestic?
Thread Starter
Join Date: Jan 2004
Location: NOVA
Age: 42
Posts: 8,552
Likes: 0
Received 0 Likes
on
0 Posts
JDM Puddle Light DIY
I installed my JDM puddle lights last night, the first one to DIY and captured the steps as I went along. This turned out be a very time consuming and difficult installation, I'd rate it a 9/10, mostly because I didn't have directions, but hopefully it'll be easier for others after this guide. The total time on this was probably 20-25 hours start to finish. With this guide and the right parts/tools it should take less than 12 hours. Anyone doing this mod should very handy with taking parts off their car, power tools and wiring.
[B]Part 1: Remove side skirts
Remove the side skirts, you can do this by unscrewing 3 screws on the back of the skirt, remove 2 clips from the underside and either unscrew 2 screws or remove a 10mm bolt (your choice). Once those are all undone, remove the skirt by pulling the skirt directly backwards, it should pop and slide out leaving a bunch of clips in the car, leave those there.
Part 2: Puddle light prep
Purchase puddle lights, I bought mine off the AZine black market, JLeviStreetWerks sells a kit that is popular with Scion owners.
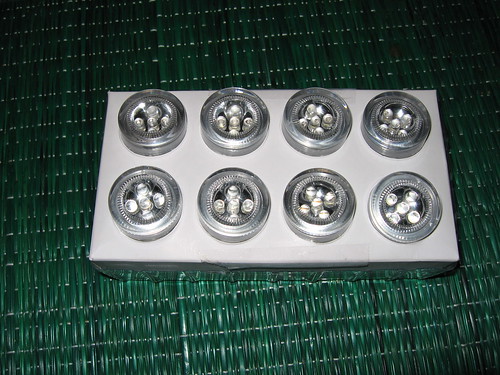
5 lights per side, 5 LEDs per light.
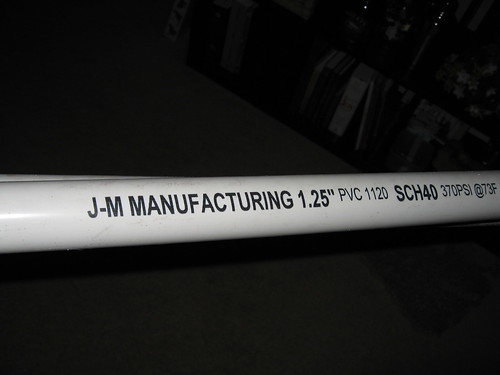
Purchase 1.25" PVC pipe, you only need ~1ft but they come in 10ft poles.
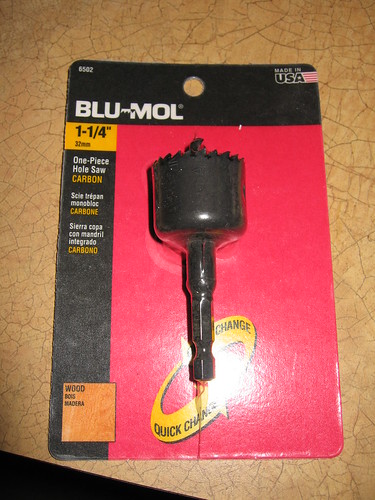
Purchase a 1 1/4" hole saw bit for a drill
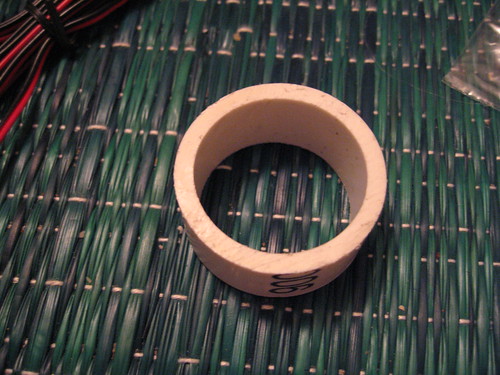
Using a saw (a miter saw makes very straight cuts) make 10 0.75� pieces of the PVC
A light will fit in the PVC, put one in and line up the holes on the light, and make a mark inside each hole. Drill each of the holes so a screw can be inserted, the hole will be near the edge of the PVC so drill at a slight angle inwards
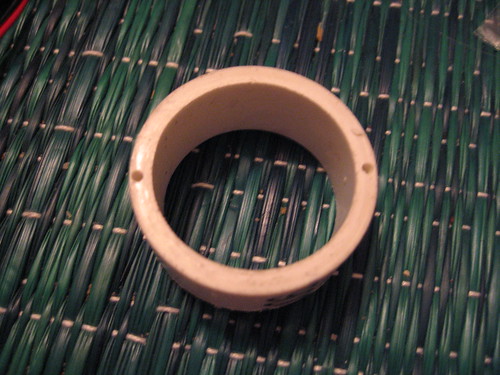
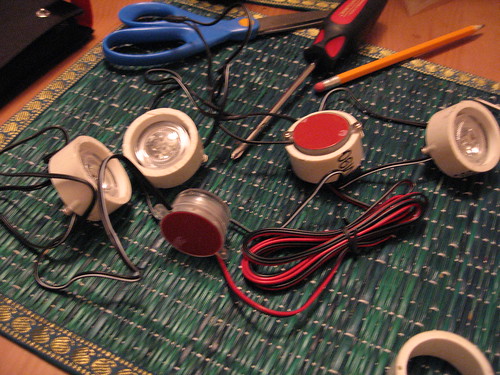
Put the light in the PVC and screw it in w/ the provided screws.
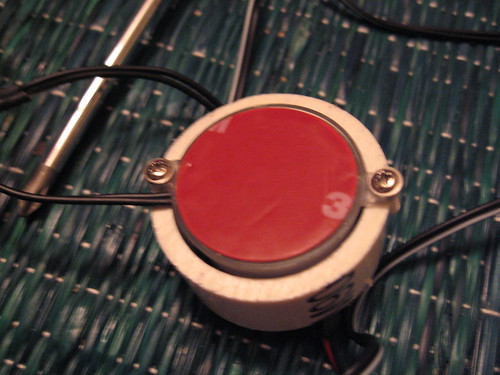
Do this for all 10, it'll look like this
Part 3: Attaching puddle lights
Measure where you want to attach the lights at on the side sill. The lights are pretty focused, so if you spread them out they will not overlap, but if you put them too close they wont cover the doors.
Now for some math. Measure the side sill, they're about 74" long, figure out the margins you want at the front and back. My length after margins was ~67". Each light w/ PVC is 1.5" wide, and there is 5, so that's 7.5" total, 67-7.5 = 59.5". Dive that by 4 (number of wires between 5 lights) and that's how long the wire between each light should be.
Now mark on the side (the outside, not the inside) where to drill your holes. Starting from your magin, measure 0.75" (the middle of a 1.5" PVC) and mark a hole, then add the length of your wire + 1.5" (other half of the first PVC and half of the next PVC). Repeat for the whole length, the result will be 5 marks for the center of the hole saw.
Next you need to figure out how far from the edge of the sill you want the light. There's not much room, mine were about 0.75" from the outer edge, ~4 1/8 from the inside edge. At the point you made your previous marks, use a ruler w/ right edge to make an X to drill
Note: measure, measure, measure, you only get 1 chance, I can't stress this enough

Drill a pilot hole through each of the X's, this will guide your hole saw. After the pilot hole is drilled, use your hole saw to bore out a hole in the side skirt. Two of my mark interfered w/ the clip holders on the inside of the skirt. Rather than move my holes, I decided to take out the bottom portion of the clip holder and glue the top to reinforce it.
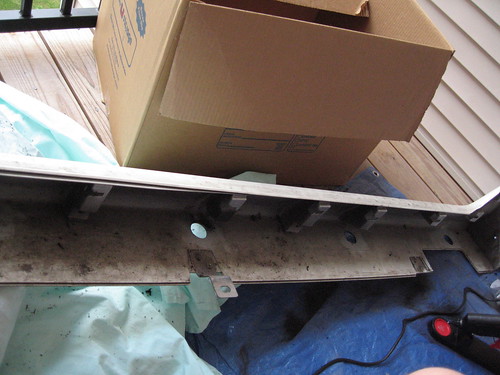
Now attach the lights to the skirt. I used super hot glue to attach the PVC, on the face of the PVC and around the base. Keep in the mind the direction you want the wires to go before you start attaching them!
When done they'll look like this
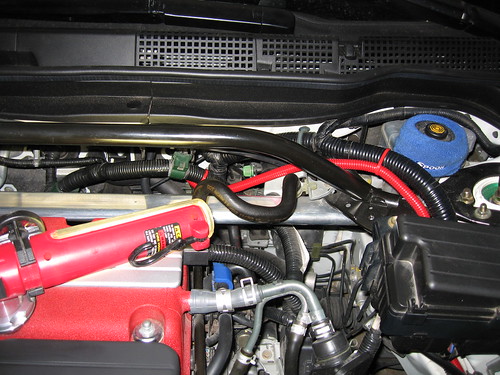
Part 4: Wiring Fusebox
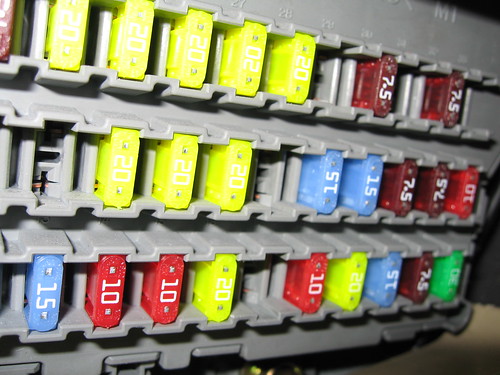
Remove the fuse box panel by sliding the door off. Unscrew the panel right below the steering wheel and take the black panel that covers the wiring under the steering wheel.
In order to have the lights dim in and out like the dome lights, you need to tap Fuse #6 (red 10A, sixth from bottom left in the box) for power, and the green/red coming from the MICU (multiplex integrated control unit) for the ground. Fuse 6 (white/blue) is a constant 12v, green/red is a variable ground that switches from 12v to 0v when the door is opened, fob pressed etc.
Green/red supplies 12v when the door is closed. 12v power (white/blue) and 12v ground (green/red) cancel each other out and result in no lights. When the door is open you get 12v power and 0v ground, lights on. A transistor takes care of the dimming from 12v -> 0v.
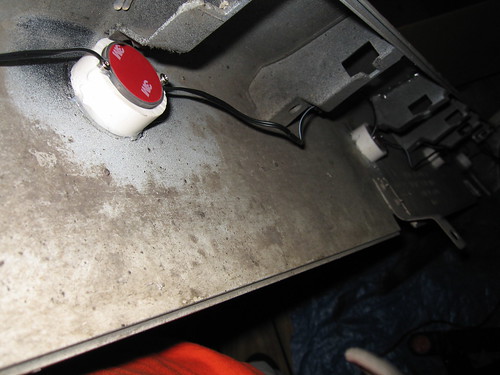
The green/red was nearly impossible to find, its on the back of the fuse box at the top. Its a 5 pin green connector that you need to feel for, unclip and remove. It looks like this
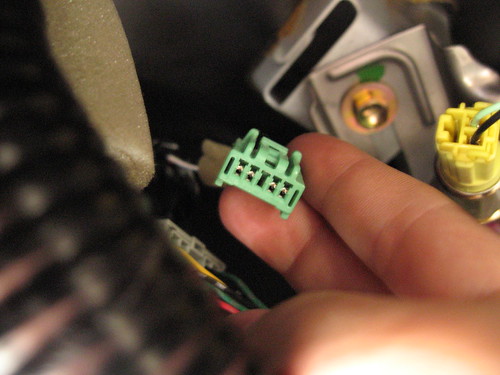
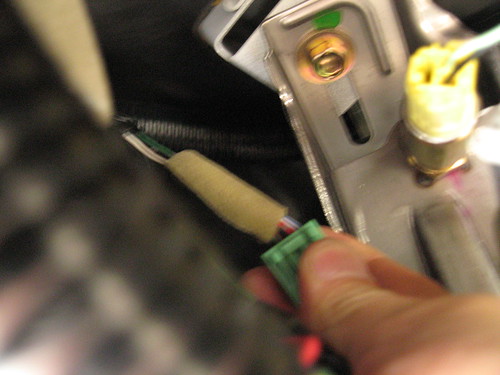
The green/red is the 2nd/4th wire from either end. Tap this wire and run a ground wire off of it.
Next tape the #6 Fuse and run a power wire from it. I used an add-a-fuse given to me by TSX.Fury to make it easier
#6 removed
add-a-fuse
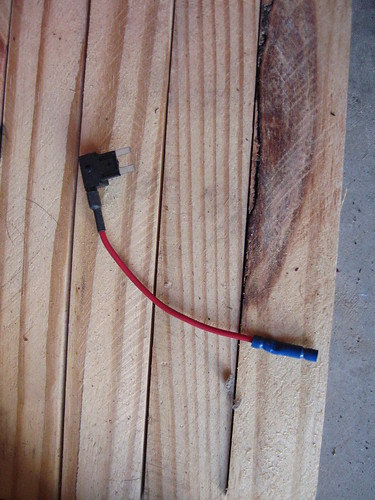
add-a-fuse in installed

Part 5: Running Wire
A main problem with this installation is the lights are on the outside of the car, you need to find a way to a) run wiring to the fusebox, b) run wire from the right side skirt to the left side of the car.
I wanted to do a clean install so I ran the wiring from the right side skirt through the right wheel fender liner, behind the trunk bumper cover, through the left wheel fender and connected it to the left side skirt lights. This turned out to be difficult because the wheel liners provide very little room to put wire through, the wire loom I was using was too big, so we passed wire wrapped in electric tape over the wheel liner.

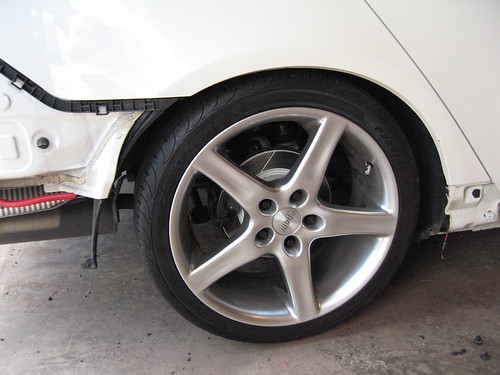
I don't know if I would recommend this method to others through, it added a lot of work removing each fender lining and the rear bumper, instead I'd suggest anyone else to try to send the right side skirt wire up the front right wheel well into the engine bay if possible.
The rear bumper is removed by taking 2 screws out of each side, 2 bolts from under the trunk and 2 clips from the underside. Pull from the sides firmly and the bumper should peel off.
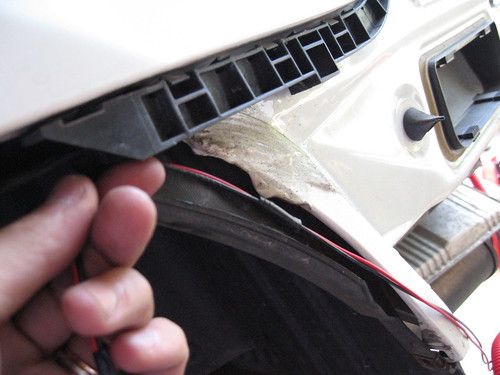
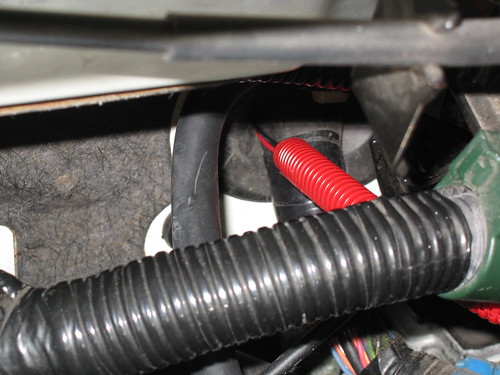
One the right side and left side were connected, I ran wire from the left side sill up the left fender wheel well, up the Intake hole into the engine bay. BTW, if your lights are like mine, the black w/ white stripe is power, solid black is ground.


Up to the firewall
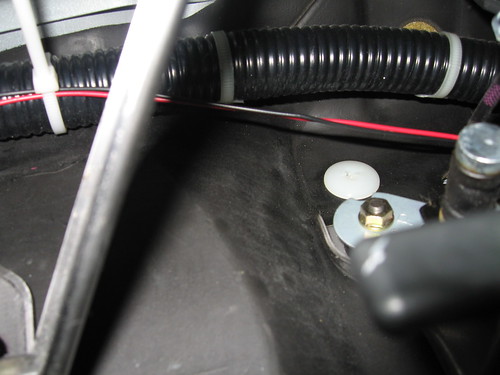
Next you need to get your wiring through the firewall. I connected both wires to a coat hanger end. I pushed the other end through the rubber firewall and had another person pull the hanger from the inside, eventually taking the wires through with it. The hanger will come through the firewall up behind the radio. Run your wires over top the steering/pedals
Firewall
Ziptie out of the way
And finally connect the wires you ran to your tapped wires in the fusebox. Test out your lights. close the door and lock it w/ the fob, they should be off, unlock the door and they should brighten quickly, lock the fob and they should dim slowly. If it doesn't work check your wires w/ a multimeter while locking and unlocking the door.
Part 6: Reinstalling side skirts
Finally put the skirts back on. Line up all the clips flat and slide the side skirt on the same way you slid it off. If for some reason it will not go on at all, remove the clips from the car by turning them 45 degrees and pulling. Push them into the side skirt. Then just press the skirt onto the car. Screw in the 3 rear screws, 2 underside clips and 2 underside screws.
Part 7: Final Product
Here's pics, it looks amazing at night.
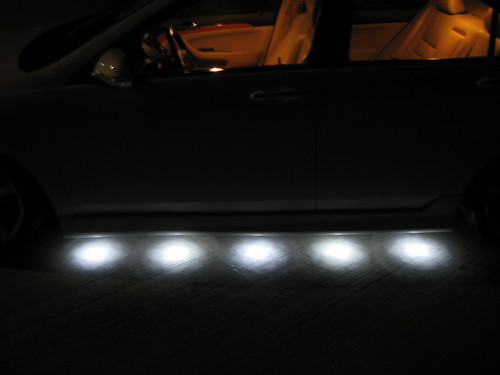
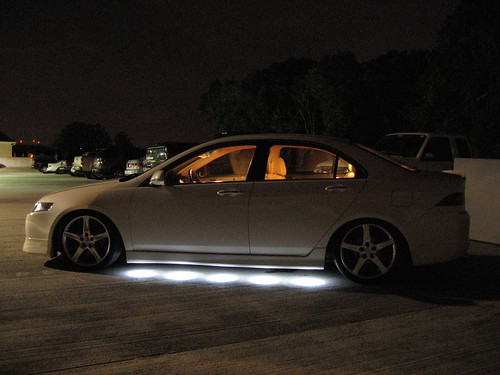
That's it (hah), good luck to all those who are adventurous enough. This is a difficult mod that requires a lot of thought and hard work. Its definately gratifying to see the final result!
[B]Part 1: Remove side skirts
Remove the side skirts, you can do this by unscrewing 3 screws on the back of the skirt, remove 2 clips from the underside and either unscrew 2 screws or remove a 10mm bolt (your choice). Once those are all undone, remove the skirt by pulling the skirt directly backwards, it should pop and slide out leaving a bunch of clips in the car, leave those there.
Part 2: Puddle light prep
Purchase puddle lights, I bought mine off the AZine black market, JLeviStreetWerks sells a kit that is popular with Scion owners.
5 lights per side, 5 LEDs per light.
Purchase 1.25" PVC pipe, you only need ~1ft but they come in 10ft poles.
Purchase a 1 1/4" hole saw bit for a drill
Using a saw (a miter saw makes very straight cuts) make 10 0.75� pieces of the PVC
A light will fit in the PVC, put one in and line up the holes on the light, and make a mark inside each hole. Drill each of the holes so a screw can be inserted, the hole will be near the edge of the PVC so drill at a slight angle inwards
Put the light in the PVC and screw it in w/ the provided screws.
Do this for all 10, it'll look like this
Part 3: Attaching puddle lights
Measure where you want to attach the lights at on the side sill. The lights are pretty focused, so if you spread them out they will not overlap, but if you put them too close they wont cover the doors.
Now for some math. Measure the side sill, they're about 74" long, figure out the margins you want at the front and back. My length after margins was ~67". Each light w/ PVC is 1.5" wide, and there is 5, so that's 7.5" total, 67-7.5 = 59.5". Dive that by 4 (number of wires between 5 lights) and that's how long the wire between each light should be.
Now mark on the side (the outside, not the inside) where to drill your holes. Starting from your magin, measure 0.75" (the middle of a 1.5" PVC) and mark a hole, then add the length of your wire + 1.5" (other half of the first PVC and half of the next PVC). Repeat for the whole length, the result will be 5 marks for the center of the hole saw.
Next you need to figure out how far from the edge of the sill you want the light. There's not much room, mine were about 0.75" from the outer edge, ~4 1/8 from the inside edge. At the point you made your previous marks, use a ruler w/ right edge to make an X to drill
Note: measure, measure, measure, you only get 1 chance, I can't stress this enough
Drill a pilot hole through each of the X's, this will guide your hole saw. After the pilot hole is drilled, use your hole saw to bore out a hole in the side skirt. Two of my mark interfered w/ the clip holders on the inside of the skirt. Rather than move my holes, I decided to take out the bottom portion of the clip holder and glue the top to reinforce it.
Now attach the lights to the skirt. I used super hot glue to attach the PVC, on the face of the PVC and around the base. Keep in the mind the direction you want the wires to go before you start attaching them!
When done they'll look like this
Part 4: Wiring Fusebox
Remove the fuse box panel by sliding the door off. Unscrew the panel right below the steering wheel and take the black panel that covers the wiring under the steering wheel.
In order to have the lights dim in and out like the dome lights, you need to tap Fuse #6 (red 10A, sixth from bottom left in the box) for power, and the green/red coming from the MICU (multiplex integrated control unit) for the ground. Fuse 6 (white/blue) is a constant 12v, green/red is a variable ground that switches from 12v to 0v when the door is opened, fob pressed etc.
Green/red supplies 12v when the door is closed. 12v power (white/blue) and 12v ground (green/red) cancel each other out and result in no lights. When the door is open you get 12v power and 0v ground, lights on. A transistor takes care of the dimming from 12v -> 0v.
The green/red was nearly impossible to find, its on the back of the fuse box at the top. Its a 5 pin green connector that you need to feel for, unclip and remove. It looks like this
The green/red is the 2nd/4th wire from either end. Tap this wire and run a ground wire off of it.
Next tape the #6 Fuse and run a power wire from it. I used an add-a-fuse given to me by TSX.Fury to make it easier
#6 removed
add-a-fuse
add-a-fuse in installed
Part 5: Running Wire
A main problem with this installation is the lights are on the outside of the car, you need to find a way to a) run wiring to the fusebox, b) run wire from the right side skirt to the left side of the car.
I wanted to do a clean install so I ran the wiring from the right side skirt through the right wheel fender liner, behind the trunk bumper cover, through the left wheel fender and connected it to the left side skirt lights. This turned out to be difficult because the wheel liners provide very little room to put wire through, the wire loom I was using was too big, so we passed wire wrapped in electric tape over the wheel liner.
I don't know if I would recommend this method to others through, it added a lot of work removing each fender lining and the rear bumper, instead I'd suggest anyone else to try to send the right side skirt wire up the front right wheel well into the engine bay if possible.
The rear bumper is removed by taking 2 screws out of each side, 2 bolts from under the trunk and 2 clips from the underside. Pull from the sides firmly and the bumper should peel off.
One the right side and left side were connected, I ran wire from the left side sill up the left fender wheel well, up the Intake hole into the engine bay. BTW, if your lights are like mine, the black w/ white stripe is power, solid black is ground.
Up to the firewall
Next you need to get your wiring through the firewall. I connected both wires to a coat hanger end. I pushed the other end through the rubber firewall and had another person pull the hanger from the inside, eventually taking the wires through with it. The hanger will come through the firewall up behind the radio. Run your wires over top the steering/pedals
Firewall
Ziptie out of the way
And finally connect the wires you ran to your tapped wires in the fusebox. Test out your lights. close the door and lock it w/ the fob, they should be off, unlock the door and they should brighten quickly, lock the fob and they should dim slowly. If it doesn't work check your wires w/ a multimeter while locking and unlocking the door.
Part 6: Reinstalling side skirts
Finally put the skirts back on. Line up all the clips flat and slide the side skirt on the same way you slid it off. If for some reason it will not go on at all, remove the clips from the car by turning them 45 degrees and pulling. Push them into the side skirt. Then just press the skirt onto the car. Screw in the 3 rear screws, 2 underside clips and 2 underside screws.
Part 7: Final Product
Here's pics, it looks amazing at night.
That's it (hah), good luck to all those who are adventurous enough. This is a difficult mod that requires a lot of thought and hard work. Its definately gratifying to see the final result!
 06-11-2006, 10:12 PM
#2
Bye TSX, hello domestic?
Thread Starter
Join Date: Jan 2004
Location: NOVA
Age: 42
Posts: 8,552
Likes: 0
Received 0 Likes
on
0 Posts
The jlevistreetwerks kit I mentioned as an alternative is well priced but lower quality. Its only $40, but the lights have only 1 LED/per. Each light has an attached piece of metal w/ tape and the instructions say to tape the lights to the bottom of the car. This is a bad idea, its difficult to line up and could fall off. However, the metal piece can be removed/unglued from the light, after which, they jlevistreetwerks kit looks like the kit in my pictures. You can screw that kit into the PVC and mount them just like I showed.
06-11-2006, 10:40 PM
#4
C'mon, man! Row yer own.
Join Date: Jun 2005
Location: WDMIA
Age: 57
Posts: 1,210
Likes: 0
Received 0 Likes
on
0 Posts
Probably not a mod I'll do, but it looks terrific and these instructions are absolutely first-rate. A real pro job installing and documenting your work!
 06-11-2006, 11:13 PM
#6
Drifting
Originally Posted by peter_bigblock
Probably not a mod I'll do, but it looks terrific and these instructions are absolutely first-rate. A real pro job installing and documenting your work!
 looks good...great job

Trending Topics

 06-12-2006, 09:24 AM
#13
Bye TSX, hello domestic?
Thread Starter
Join Date: Jan 2004
Location: NOVA
Age: 42
Posts: 8,552
Likes: 0
Received 0 Likes
on
0 Posts
Originally Posted by puiyingbread
super nice !!!
anyways~~~what color is yr interior light?? is that LED?
anyways~~~what color is yr interior light?? is that LED?
06-12-2006, 09:45 AM
#15
Tristate ViP Crew
Nice write up..I just received my Jlevi lights , they definately won't be as bright as those..OMG! The Jlevi only has 1 led compared to 5, I'm gonna hook it up to the stock side skirt for now until I receive my OEM lip kit side skirt. Nice write up, seems like a lot of work thank god I have an led genious doing mine.
06-12-2006, 11:08 AM
#16
Instructor

Join Date: Apr 2006
Location: vancouver
Age: 39
Posts: 129
Likes: 0
Received 0 Likes
on
0 Posts
Originally Posted by xizor
its stock lighting, the camera exposure makes it look darker than it is
anyways~~nice job
06-12-2006, 01:43 PM
#17
Bye TSX, hello domestic?
Thread Starter
Join Date: Jan 2004
Location: NOVA
Age: 42
Posts: 8,552
Likes: 0
Received 0 Likes
on
0 Posts
Here's a video of them turning on and off for those who aren't sure what Puddle Lights look like. In the vid I used the fob to unlock the door, then lock it, then unlock again, and then started the car, turned off the car, then locked it with the fob.
link
link
 06-12-2006, 11:38 PM
#22
Originally Posted by xizor
Here's a video of them turning on and off for those who aren't sure what Puddle Lights look like. In the vid I used the fob to unlock the door, then lock it, then unlock again, and then started the car, turned off the car, then locked it with the fob.
link
link
06-14-2006, 01:00 PM
#24
Racer

Join Date: Jan 2004
Location: Fresno CA
Age: 43
Posts: 351
Likes: 0
Received 0 Likes
on
0 Posts
That is bad ass. I want to do this now. You also gave me a good idea at how to attatch to the dome lights to make lights dimmed. I have been wanting to hook up a led light to the car and put it under the seat and dash. So when you get in, the floor will light up and dim with the dome lights. Thanks. And great job.

The following users liked this post:
awats (03-01-2014)
06-26-2006, 03:00 PM
#35
Moderator
Regional Coordinator (Southeast)
Regional Coordinator (Southeast)
Join Date: Dec 2003
Location: Mooresville, NC
Age: 37
Posts: 43,470
Received 3,657 Likes
on
2,491 Posts
Originally Posted by madmanmax3000
so can anybody tell me where to find the good puddle lights? the 5-LED ones?
http://www.l-tunedparts.com/product/?id=1641
 06-26-2006, 06:01 PM
#37
Bye TSX, hello domestic?
Thread Starter
Join Date: Jan 2004
Location: NOVA
Age: 42
Posts: 8,552
Likes: 0
Received 0 Likes
on
0 Posts
Originally Posted by CCColtsicehockey
you can get them here but they are very expensive. I am looking to do them in the near future.
http://www.l-tunedparts.com/product/?id=1641
http://www.l-tunedparts.com/product/?id=1641
06-26-2006, 07:24 PM
#40
Professional Newbie
Join Date: Apr 2004
Location: Boston, MA
Age: 36
Posts: 1,197
Likes: 0
Received 0 Likes
on
0 Posts
Originally Posted by CCColtsicehockey
you can get them here but they are very expensive. I am looking to do them in the near future.
http://www.l-tunedparts.com/product/?id=1641
http://www.l-tunedparts.com/product/?id=1641
